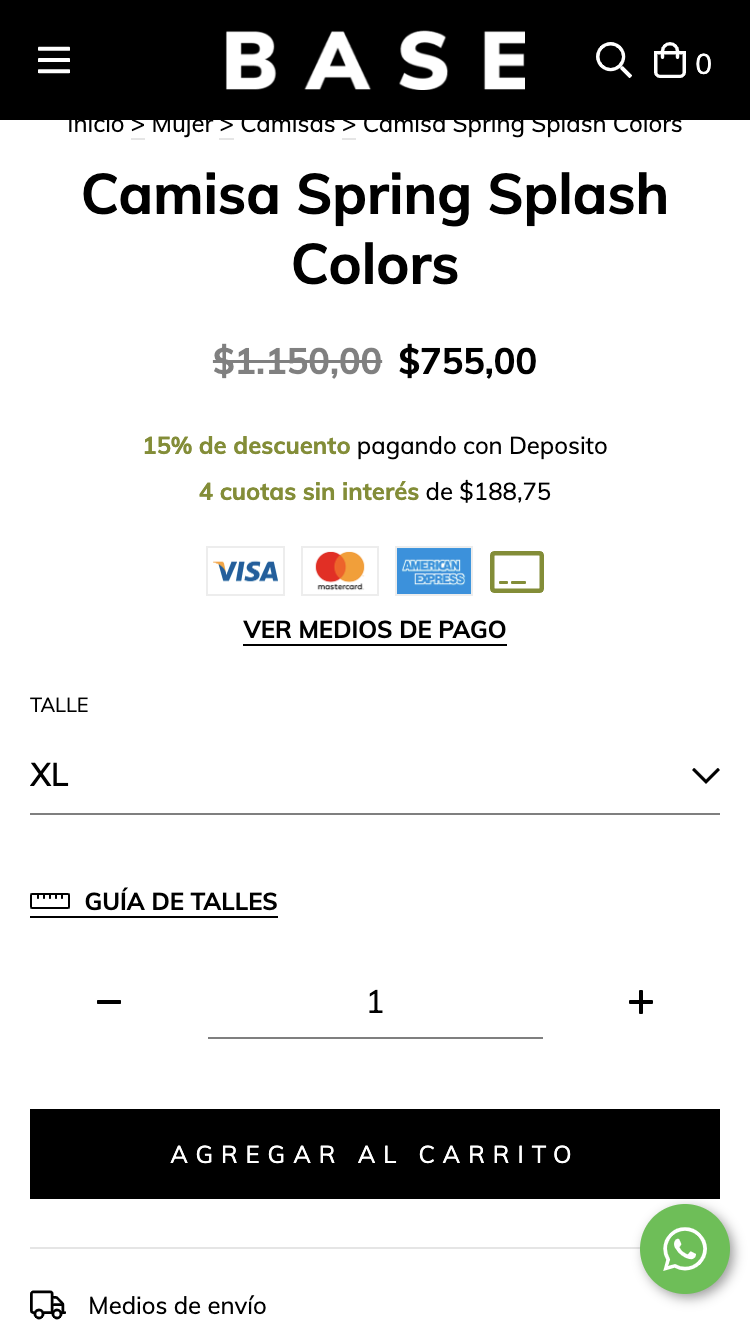
En este tutorial vamos a ver como incluir una guía para ofrecer más información al momento de elegir un talle en el detalle del producto:

HTML
1. Lo primero que vamos a hacer, es modificar el siguiente código en el snipplet llamado product-form.tpl dentro de la carpeta snipplets/product:
Deberíamos reemplazar:
{% if product.variations %}
        {% include "snipplets/product/product-variants.tpl" %}
{% endif %}
Por:
{% if product.variations %}
        {% include "snipplets/product/product-variants.tpl" with {show_size_guide: true} %}
{% endif %}2. Luego sumamos el link para mostrar la guía de talles en el snipplet llamado product-variants.tpl dentro de la carpeta snipplets/product:
<div class="js-product-variants{% if quickshop %} js-product-quickshop-variants text-left{% endif %} form-row">
    {% set has_size_variations = false %}
    {% for variation in product.variations %}
        <div class="js-product-variants-group {% if variation.name in ['Color', 'Cor'] %}js-color-variants-container{% endif %} {% if loop.length == 3 %} {% if quickshop %}col-4{% else %}col-12{% endif %} col-md-4 {% elseif loop.length == 2 %} col-6 {% else %} col {% if quickshop %}col-md-12{% else %}col-md-6{% endif %}{% endif %}">
            {% embed "snipplets/forms/form-select.tpl" with{select_label: true, select_label_name: '' ~ variation.name ~ '', select_for: 'variation_' ~ loop.index , select_data: 'variant-id', select_data_value: 'variation_' ~ loop.index, select_name: 'variation' ~ '[' ~ variation.id ~ ']', select_custom_class: 'js-variation-option js-refresh-installment-data'} %}
                {% block select_options %}
                    {% for option in variation.options %}
                        <option value="{{ option.id }}" {% if product.default_options[variation.id] == option.id %}selected="selected"{% endif %}>{{ option.name }}</option>
                    {% endfor %}
                {% endblock select_options%}
            {% endembed %}
        </div>
        {% if variation.name in ['Talle', 'Talla', 'Tamanho', 'Size'] %}
            {% set has_size_variations = true %}
        {% endif %}
    {% endfor %}
    {% if show_size_guide and settings.size_guide_url and has_size_variations %}
        {% set has_size_guide_page_finded = false %}
        {% set size_guide_url_handle = settings.size_guide_url | trim('/') | split('/') | last %}

        {% for page in pages if page.handle == size_guide_url_handle and not has_size_guide_page_finded %}
            {% set has_size_guide_page_finded = true %}
            {% if has_size_guide_page_finded %}
                <div class="col-12 mb-4">
                    <a data-toggle="#size-guide-modal" data-modal-url="modal-fullscreen-size-guide" class="js-modal-open js-fullscreen-modal-open btn-link">
                        {% include "snipplets/svg/ruler-horizontal.tpl" with {svg_custom_class: "icon-inline icon-lg svg-icon-primary mr-1"} %}
                        {{ 'Guía de talles' | translate }}
                    </a>
                </div>
                {% embed "snipplets/modal.tpl" with{modal_id: 'size-guide-modal', modal_position: 'bottom', modal_transition: 'slide', modal_header: true, modal_footer: true, modal_width: 'centered', modal_mobile_full_screen: 'true'} %}
                    {% block modal_head %}
                        {{ 'Guía de talles' | translate }}
                    {% endblock %}
                    {% block modal_body %}
                        <div class="user-content">
                            {{ page.content }}
                        </div>
                    {% endblock %}
                {% endembed %}
            {% endif %}
        {% endfor %}
    {% endif %}
</div>
3. Por último para la parte de HTML, necesitamos agregar dentro de snipplets/svg el ícono que acompaña al link con el nombre ruler-horizontal.tpl
<svg class="{{ svg_custom_class }}" xmlns="http://www.w3.org/2000/svg" viewBox="0 0 640 512"><path d="M608 128H32c-17.67 0-32 14.33-32 32v192c0 17.67 14.33 32 32 32h576c17.67 0 32-14.33 32-32V160c0-17.67-14.33-32-32-32zm0 224H32V160h80v56c0 4.42 3.58 8 8 8h16c4.42 0 8-3.58 8-8v-56h64v56c0 4.42 3.58 8 8 8h16c4.42 0 8-3.58 8-8v-56h64v56c0 4.42 3.58 8 8 8h16c4.42 0 8-3.58 8-8v-56h64v56c0 4.42 3.58 8 8 8h16c4.42 0 8-3.58 8-8v-56h64v56c0 4.42 3.58 8 8 8h16c4.42 0 8-3.58 8-8v-56h80v192z"/></svg>CSS
Requisito:
Tener agregados en tu diseño las clases helpers. Podés seguir este este pequeño tutorial para hacerlo (simplemente es copiar y pegar algunas clases, no toma más de 1 minuto).
JS
⚠️ A partir del día 30 de enero de 2023, la librería jQuery será removida del código de nuestras tiendas, por lo tanto la función "$" no podrá ser utilizada.
El JavaScript necesitamos agregarlo en el archivo store.js.tpl (o donde tengas tus funciones de JS).
{#/*============================================================================
  #Modals
==============================================================================*/ #}

{# Full screen mobile modals back events #}

if (window.innerWidth < 768) {

    {# Clean url hash function #}

    cleanURLHash = function(){
        const uri = window.location.toString();
        const clean_uri = uri.substring(0, uri.indexOf("#"));
        window.history.replaceState({}, document.title, clean_uri);
    };

    {# Go back 1 step on browser history #}

    goBackBrowser = function(){
        cleanURLHash();
        history.back();
    };

    {# Clean url hash on page load: All modals should be closed on load #}

    if(window.location.href.indexOf("modal-fullscreen") > -1) {
        cleanURLHash();
    }

    {# Open full screen modal and url hash #}

    jQueryNuvem(document).on("click", ".js-fullscreen-modal-open", function(e) {
        e.preventDefault();
        var modal_url_hash = jQueryNuvem(this).data("modalUrl");
        window.location.hash = modal_url_hash;
    });

    {# Close full screen modal: Remove url hash #}

    jQueryNuvem(document).on("click", ".js-fullscreen-modal-close", function(e) {
        e.preventDefault();
        goBackBrowser();
    });

    {# Hide panels or modals on browser backbutton #}

    window.onhashchange = function() {
        if(window.location.href.indexOf("modal-fullscreen") <= -1) {

            {# Close opened modal #}

            if(jQueryNuvem(".js-fullscreen-modal").hasClass("modal-show")){

                {# Remove body lock only if a single modal is visible on screen #}

                if(jQueryNuvem(".js-modal.modal-show").length == 1){
                    jQueryNuvem("body").removeClass("overflow-none");
                }

                var $opened_modal = jQueryNuvem(".js-fullscreen-modal.modal-show");
                var $opened_modal_overlay = $opened_modal.prev();

                $opened_modal.removeClass("modal-show");
                setTimeout(() => $opened_modal.hide(), 500);
                $opened_modal_overlay.fadeOut(500);


            }
        }
    }
}

jQueryNuvem(document).on("click", ".js-modal-open", function(e) {
    e.preventDefault();
    var modal_id = jQueryNuvem(this).data('toggle');
    var $overlay_id = jQueryNuvem('.js-modal-overlay[data-modal-id="' + modal_id + '"]');
    if (jQueryNuvem(modal_id).hasClass("modal-show")) {
        let modal = jQueryNuvem(modal_id).removeClass("modal-show");
        setTimeout(() => modal.hide(), 500);
    } else {

        {# Lock body scroll if there is no modal visible on screen #}

        if(!jQueryNuvem(".js-modal.modal-show").length){
            jQueryNuvem("body").addClass("overflow-none");
        }
        $overlay_id.fadeIn(400);
        jQueryNuvem(modal_id).detach().appendTo("body");
        $overlay_id.detach().insertBefore(modal_id);
        jQueryNuvem(modal_id).show().addClass("modal-show");
    }
});

jQueryNuvem(document).on("click", ".js-modal-close", function(e) {
    e.preventDefault();
    {# Remove body lock only if a single modal is visible on screen #}

    if(jQueryNuvem(".js-modal.modal-show").length == 1){
        jQueryNuvem("body").removeClass("overflow-none");
    }
    var $modal = jQueryNuvem(this).closest(".js-modal");
    var modal_id = $modal.attr('id');
    var $overlay_id = jQueryNuvem('.js-modal-overlay[data-modal-id="#' + modal_id + '"]');
    $modal.removeClass("modal-show");
    setTimeout(() => $modal.hide(), 500);
    $overlay_id.fadeOut(500);

    {# Close full screen modal: Remove url hash #}

    if ((window.innerWidth < 768) && (jQueryNuvem(this).hasClass(".js-fullscreen-modal-close"))) {
        goBackBrowser();
    }
});

jQueryNuvem(document).on("click", ".js-modal-overlay", function(e) {
    e.preventDefault();
    {# Remove body lock only if a single modal is visible on screen #}

    if(jQueryNuvem(".js-modal.modal-show").length == 1){
        jQueryNuvem("body").removeClass("overflow-none");
    }
    var modal_id = jQueryNuvem(this).data('modalId');
    let modal = jQueryNuvem(modal_id).removeClass("modal-show");
    setTimeout(() => modal.hide(), 500);
    jQueryNuvem(this).fadeOut(500);

    if (jQueryNuvem(this).hasClass("js-fullscreen-overlay") && (window.innerWidth < 768)) {
        cleanURLHash();
    }
});
Configuraciones
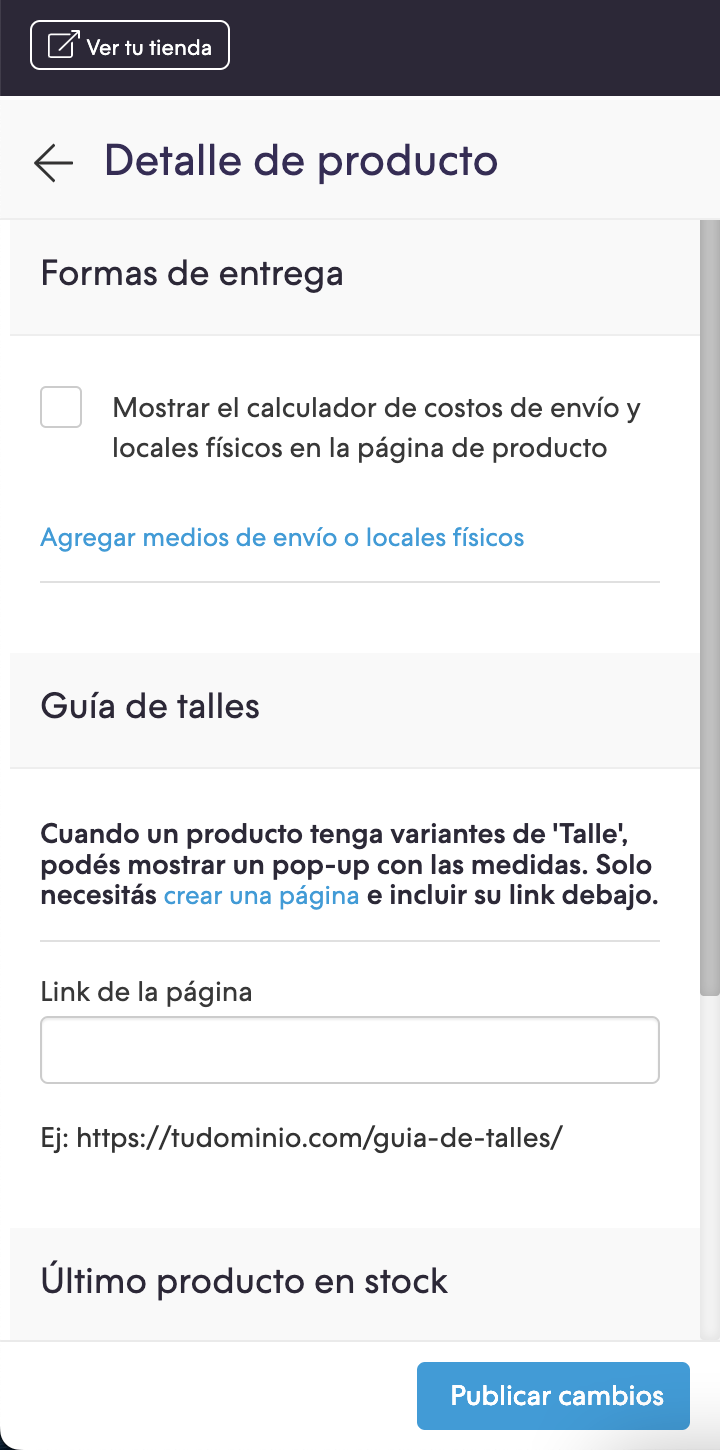
En el archivo config/settings.txt vamos a agregar el campo que activa la funcionalidad dentro de la sección “Detalle de producto”.
    title
        title = Guía de talles
    subtitle
        subtitle = Cuando un producto tenga variantes de 'Talle', podés mostrar un pop-up con las medidas. Solo necesitás <a target='_blank' href='/admin/pages/'>crear una página</a> e incluir su link debajo.
    i18n_input
        name = size_guide_url
        description = Link de la página
    description
        description = Ej: https://tudominio.com/guia-de-talles/
Traducciones
En este paso agregamos los textos para las traducciones en el archivo config/translations.txt
es "Guía de talles"
en "Size guide"
pt "Guia de medidas"
es_mx "Guía de tallas"

es "Cuando un producto tenga variantes de 'Talle', podés mostrar un pop-up con las medidas. Solo necesitás <a target='_blank' href='/admin/pages/'>crear una página</a> e incluir su link debajo."
pt "Quando houver um produto com variações de 'Tamanho', você pode incluir um pop-up na sua loja com as medidas. Basta <a target='_blank' href='/admin/pages/'>criar uma página</a> e inserir o link aqui."
en "When a product has 'Size' variants, you can show a pop-up with the measurements. You just need to <a target='_blank' href='/admin/pages/'>create a page</a> and include its link below."
es_mx "Cuando un producto tenga variantes de 'Talla', puedes mostrar un pop-up con las medidas. Solo necesitas <a target='_blank' href='/admin/pages/'>crear una página</a> e incluir su link debajo."

es "Link de la página"
pt "Link da página"
en "Page link"
es_mx "Link de la página"

es "Ej: https://tudominio.com/guia-de-talles/"
pt "Ex: https://seudominio.com/guia-de-medidas/"
en "Ej: https://yourdomain.com/size-guide/"
es_mx "Ej: https://tudominio.com/guia-de-tallas/"
Activación
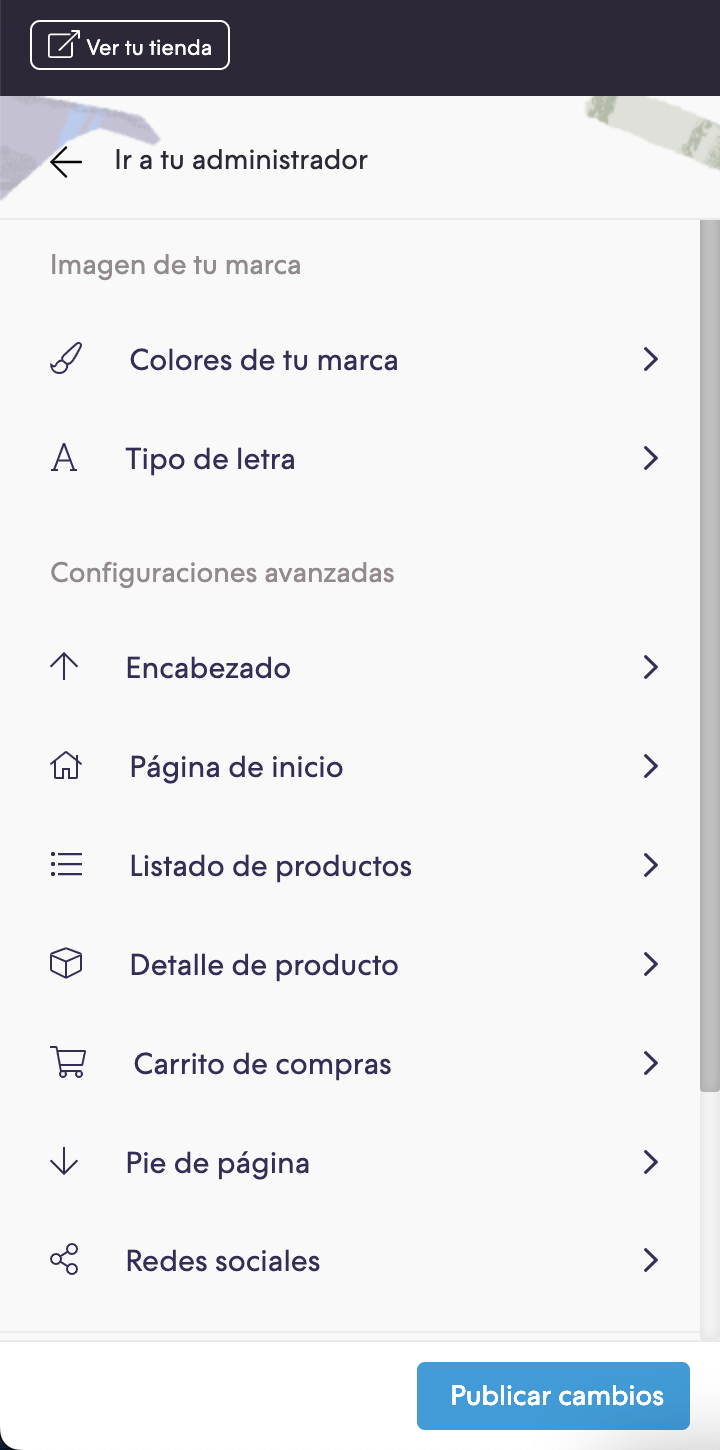
Por último podés activar la funcionalidad desde el Administrador nube, primero debés crear una página de contenido en la sección de Páginas destinada para la guía de talles. Luego agregar el link en la sección de Personalizar tu diseño actual dentro del Detalle de producto:


Recordá que para que se vea la guía, el producto debe tener la variante “Talle” creada.